Quick Start Guide
This quick start guide covers how to install navigate, launch it in synthetic hardware mode to confirm it is working, and save an image to disk.
Installation
Install Miniconda. Download and install Miniconda from the official website.
Create and Activate a Conda Environment. Launch a Miniconda Prompt (or a Terminal on MacOS) and enter the following.
(base) conda create -n navigate python=3.9.7
(base) conda activate navigate
Install navigate.
(navigate) pip install navigate-micro
Launch navigate in synthetic hardware mode. This will allow you to test its functionality without actual hardware.
(navigate) navigate -sh
Saving a Z-Stack to Disk
To save an image to disk, follow these steps:
Launch navigate in synthetic hardware mode as described above.
Next to the the Acquire button on the upper left, make sure that the acquisition mode in the dropdown is set to “Continuous Scan”.
Press Acquire (ctrl + enter) and confirm that a synthetic noise image is displayed in the Camera View window.
Note
At least one channel must be selected (checkbox marked) in the Channel Settings window, and all of the parameters (e.g., Power) in that row must be populated.
Select the Channels tab. In the Stack Acquisition Settings window in this tab, press the Set Start Pos/Foc button. This specifies the starting
ZandF(e.g., Focus) positions for the stack acquisition.Select the Stage Control tab (ctrl + 3), move the
Zstage to the desired position (e.g.,100μm), go back to the Channels tab (ctrl + 1), and press the Set End Pos/Foc button. This specifies the endingZandFpositions for the stack acquisition.In the Stack Acquisition Settings frame, you can now adjust the step size, which determines the number of slices in a z-stack.
In the Timepoint Settings window, select Save Data by marking the checkbox. If the number of timepoints is set to
1, only a single stack will be acquired.Next to the the Acquire button on the upper left, change the acquisition mode in the dropdown to “Z-Stack”, and press Acquire (ctrl + enter).
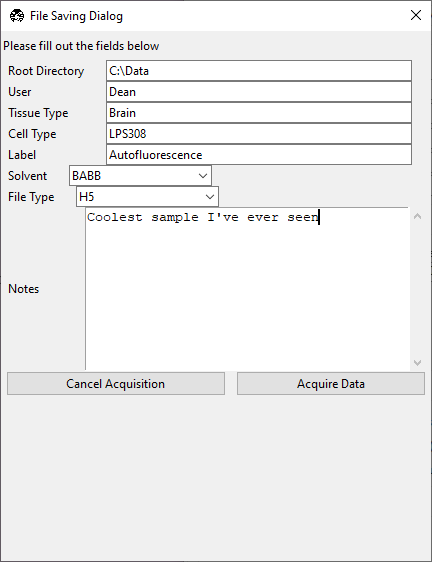
- A File Saving Dialog popup window will appear.
With the exception of Notes, all fields must be populated. Any spaces in the fields will be replaced with an underscore.
Notes is saved with the metadata, and can be useful for describing the experiment.
Solvent is useful for tissue clearing experiments.
File Type can be set to .TIFF, OME-TIFF, H5, or N5. The latter two options are pyramidal file formats that are best used for large datasets and are immediately compatible with BigDataViewer and BigStitcher.
Press Acquire to begin the acquisition.
Once complete, the data can be opened using standard image processing software such as Fiji.