Automatic Multiscale Tiling
Smart Tiling in navigate enables automated, multi-resolution imaging across different magnification levels by selectively tiling only regions of interest. Tiling can take place at different magnifications within one microscope object, or between two separate microscope objects. This approach minimizes unnecessary data acquisition by avoiding the imaging of empty or biologically irrelevant space, significantly improving throughput and data efficiency.
This guide provides a step-by-step overview of how to set up and use the VolumeSearch feature in navigate, which enables automated tiling across independent imaging modules.
Configure Low-Resolution Imaging Parameters
Begin with the lower magnification imaging system (e.g., 1x in the macroscale module).
Set the appropriate Z-scan range and step size to capture a low-resolution overview of the sample.
The range should be sufficient to capture the entirety of the specimen, and the step size should be set according to the size of the volume that you wish to image at higher resolution.
For example, if the step size is 50 microns for the low-resolution imaging system, then the Z-scan range for the high-resolution imaging system will become 50 microns.
Select the VolumeSearch feature from the Features menu in navigate.
Confirm that the Feature is Selected:
Ensure that the VolumeSearch feature is selected in the features list menu.
Change the acquisition mode to Customized, and select Acquire.
This will open the Feature List Configuration Window.
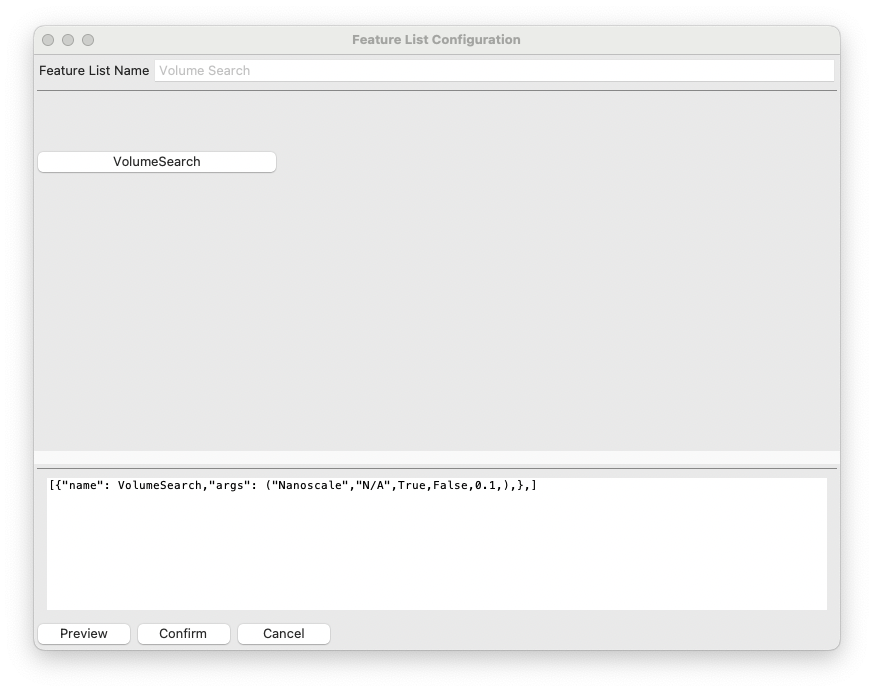
Press the VolumeSearch Button in the Feature List Configuration Window:
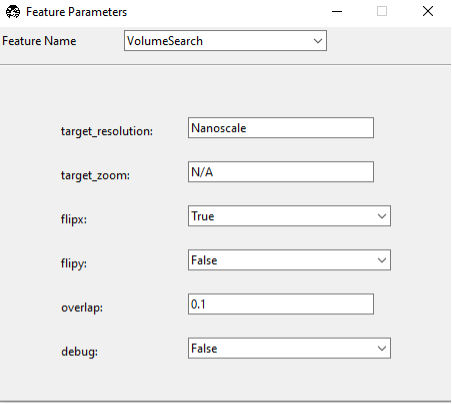
This will open the Feature Parameters window, which is where you configure the VolumeSearch feature. It includes the following entries:
target_resolution: Set to higher-resolution imaging system that we will be switching to upon completion of the low-resolution imaging.
target_zoom: Set to the zoom level for the system that you wish to use for high-resolution imaging.
flipx: Allows you to flip the x-axes between the imaging systems (e.g., a positive movement for microscope 1 is a negative movement for microscope 2).
flipy: Allows you to flip the y-axes between the imaging systems (e.g., a positive movement for microscope 1 is a negative movement for microscope 2).
overlap: The desired overlap between adjacent images in the X and Y directions for the target imaging system.
debug: Set to False. This is used for debugging purposes.
Once you have configured the parameters, close the window to save the settings.
Press Confirm to Begin Imaging:
This will start the low-resolution imaging process.
Once the low-resolution scan is complete, the software will automatically segment and define the boundaries of the sample using a basic Otsu threshold.
These regions are then used to populate the multiposition table with target coordinates for tiling.
Switch to the Target Imaging Mode
Switch to the microscope that was specified according to the
target_resolution(e.g., switch from macroscale to nanoscale).Set the system to the correct
target_zoomand verify stage alignment and calibration.
Configure Acquisition Settings
Select the Multiposition option and enable Z Stack acquisition.
Verify the camera settings, channel selections, and waveform configurations as appropriate for the resolution.
If you wish to save the data, make sure tha the Save Data option is selected.
Start Smart Tiling Acquisition
Press Confirm to begin imaging.
The system will automatically visit each position in the multiposition table and acquire image stacks at the desired resolution.