Menu Bar
For actions that support keyboard shortcuts, the required keystrokes are shown directly in the menu entry.
File
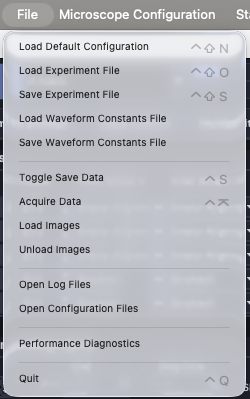
The File menu is used to:
Load Default Configuration: load a configuration file.
Load Experiment File: load a previously saved experiment state and restore microscope settings exactly as they were. The experiment file is also saved automatically with each acquisition.
Save Experiment File: save the current microscope settings to an experiment file.
Load Waveform Constants File / Save Waveform Constants File: load or save waveform settings used for devices such as galvos and remote focus hardware. Waveform constants are also saved automatically with each acquisition.
Toggle Save Data: toggle the Save Data checkbox.
Acquire Data: start acquisition (same action as Acquire in the Acquisition Bar).
Load Images: load image data into the display. This is useful for feature-development and testing when not running on a microscope.
Unload Images: remove loaded images from the display.
Open Log Files: open the log directory in Finder. Logs are useful for debugging and for reporting issues on GitHub.
Open Configuration Files: open the directory containing configuration files in Finder.
Performance Diagnostics: open a popup with timing metrics (for example, image display and data-saving timing) to help diagnose performance bottlenecks.
Microscope Configuration
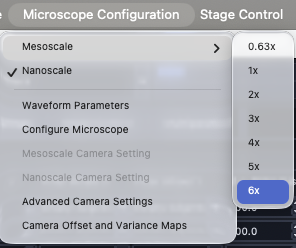
This menu allows users to:
Select between microscope instances listed at the top of the menu.
Choose microscope magnifications from the submenu shown to the right when multiple magnifications are available.
Open Waveform Parameters.
Open to launch Configure Microscopes.
Open Advanced Camera Settings for camera cooling controls, trigger settings, and camera flip flags that control display orientation.
When operating a multi-microscope system, camera settings can be configured independently for each microscope.
Stage Control Menu
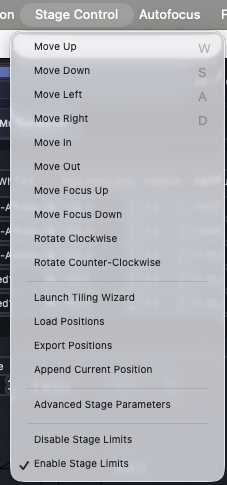
This menu groups stage and positioning actions:
Direct stage movement for
X,Y,Z,focus, andTheta.Multiposition utilities, including Tiling Wizard launch and Append Current Position to add the current stage coordinates to the multi-position table. Positions can then be removed from the table using its row context menu.
Export Positions saves the current multi-position table to disk.
Load Positions imports multi-position entries from
.csv,.yml, or.txtfiles.Advanced Stage Parameters opens stage-level controls for flip flags and stage limits for each configured stage axis.
Disable Stage Limits / Enable Stage Limits toggle stage-limit enforcement.
Autofocus
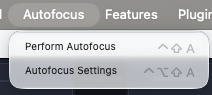
The autofocus menu provides:
Perform Autofocus.
Autofocus Settings to open Autofocus Settings.
Features
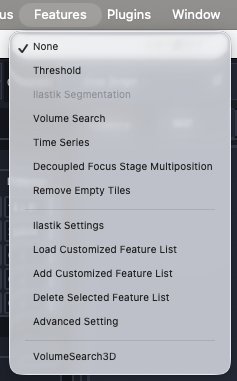
This menu manages acquisition feature lists. See Reconfigurable Acquisitions Using Features.
Plugins

This menu opens installed plugins that provide popup GUIs.
Window

This menu is used to:
Switch between major settings notebooks.
Move the camera display to a popup window.
Open the online documentation via Help.